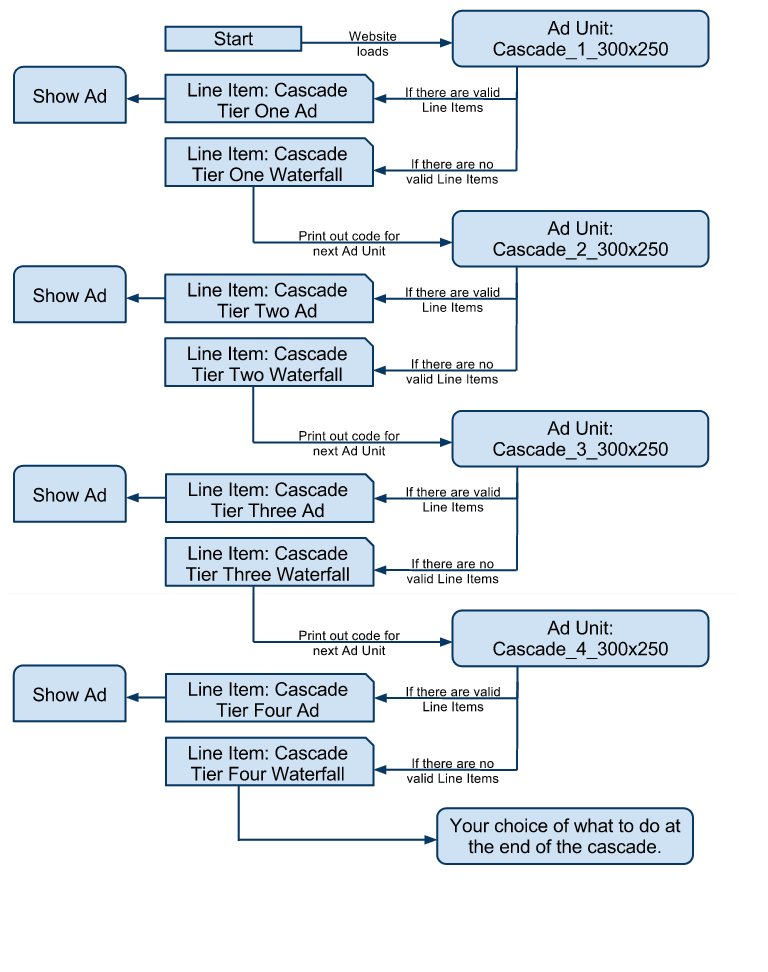
Often requested of Google DoubleClick for Publishers (DFB) Small Business (SB) is the ability to create a cascade.
Unfortunately, DFP Small Business does not innately allow you to create a cascade.
DFP Small Business does all the micromanaging for you on determining what ad to show based on the settings you have done.
But it’s still possible to do a cascade by utilizing the way the system works.
How it works
Cascading Line Items is basically having one Line Item deliver until it finishes after which the next Line Item in line starts their run.
You can emulate this by utilizing the 4 things:
- Deliver impressions option “As fast as possible”.
- House priority
- Javascript
- Multiple Ad Units/Ad Placements
The Premise
Please do note that this process is intended for use when there are no other non-cascading Line Items on the Ad Unit/Ad Placement being used.The basis premise of the process is this:
- Having one Line Item “take over” an Ad Unit. You can use either Standard or Sponsorship. I prefer standard as often Cascades are done by “serve X impressions for this Line Item then serve Y impressions for other Line Item” vs being time determined (in which case you really don’t need to do this type of cascade).
- Having one Line Item with a House priority with a Creative that writes out a new Ad Unit.
The Scenario
Overall, that’s how it works. Let’s get to the nitty gritty then, shall we?
For our scenario, we have 4 Tiers that should cascade. They are aptly named:
- Tier One
- Tier Two
- Tier Three
- Tier Four
The Set Up
For a 4 Tiered Cascade, we need 4 Ad Units (and 4 Ad Placements, each Ad Placement will refer to one Ad Unit) and 7 or 8 Line Items.
The Ad Units
Here are the Ad Units I created
- Tier One
- Ad Unit: Cascade_1_300x250
- Ad Placement: Cascade_Tier_1
- Tier Two
- Ad Unit: Cascade_2_300x250
- Ad Placement: Cascade_Tier_2
- Tier Three
- Ad Unit: Cascade_3_300x250
- Ad Placement: Cascade_Tier_3
- Tier Four
- Ad Unit: Cascade_4_300x250
- Ad Placement: Cascade_Tier_4
The Line Items
Here is the first Tier of Line Items I created with the basic settings.
- Tier One
- Cascade Tier One Ad
Type: Standard High
Start Date: Immediately (or whenever you want it to start)
End Date: Unlimited
Quantity: 100
Deliver Impressions: As fast as possible
Target Inventory: Cascade_Tier_1 - Cascade Tier One Waterfall
Type: House
Start Date: Immediately (or whenever you want it to start)
End Date: Unlimited (important to set unlimited!)
Goal: 100%
Target Inventory: Cascade_Tier_1
- Cascade Tier One Ad
That’s how I have set up the Line Items for Tier One.
Tier 2, 3 and 4 follow the same exact settings. For the Line Item “Cascade Tier One Ad”, you would put your normal Creative here.
This is the ad you want to see in the first cascade. For the Line Item “Cascade Tier One
Waterfall”, instead of putting a Creative in there, you would put this:
<script type="text/javascript">
document.write('<scr'+'ipt type="text/javascript">');
document.write('GA_googleFillSlot("Cascade_2_300x250");');
document.write('<\/scr'+'ipt>');
</script>
The above code uses Javascript to print out the DFP code for the next Ad Unit:
Cascade_2_300x250.
Which causes DFP to load the Ad for this Unit (“Cascade Tier Two Ad”).
When “Cascade Tier Two Ad” finishes its run, the House Line item “Cascade Tier Two
Waterfall” would happen and would have a code similar to above but would cause it to
print out the DFP code for the 3rd Tier “Cascade_3_300x250”.
And repeat.

When it gets the “Cascade Tier Four Waterfall”, the last House Line Item, you may wish
to have it load another Ad Unit (your standard website Ad Unit, for example) so that
there is something there.
Or put a regular House ad in that Line Item.
